

3 Ways to Download Windows 10 ISO from Microsoft Website
If you need a Windows 10 ISO file, just download it from the Microsoft website. This article will show you how to download a Windows 10 ISO file from the Microsoft website on a Windows computer. There are three methods for you to choose from.

- Way 1: Download Windows 10 ISO with Media Creation Tool
- Way 2: Download Windows 10 ISO via Chrome without any tools
- Way 3: Download Windows 10 ISO using Rufus
Way 1: Download Windows 10 ISO with Media Creation Tool
On non-Windows devices like Macs, phones, etc., the Microsoft website provides a button to directly download the Windows 10 ISO file. But on Windows computers, Microsoft requires you to download the Windows 10 ISO file using the Media Creation Tool.
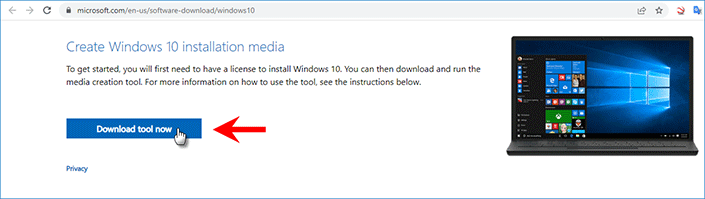
Step 1: Open Microsoft Windows 10 Download page in any browser on your Windows computer. Then, click Download tool now under the "Create Windows 10 installation media" section to download the Media Creation Tool.
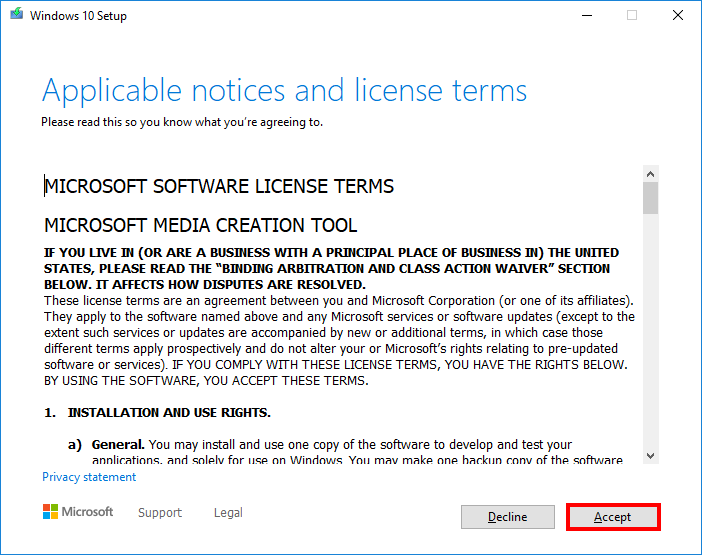
Step 2: Run the Media Creation Tool and the Windows 10 Setup wizard will open. Click Accept.
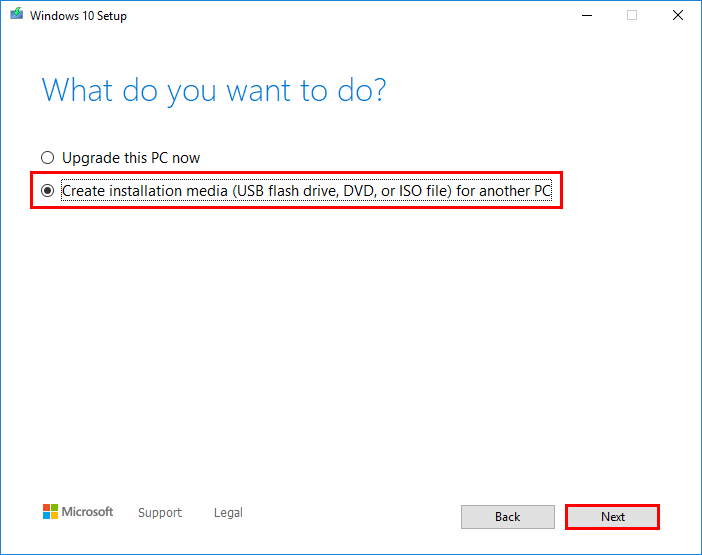
Step 3: On the "What do you want to do"page, choose "Create installation media (USB flash drive, DVD, or ISO file) for another PC", and then click Next.
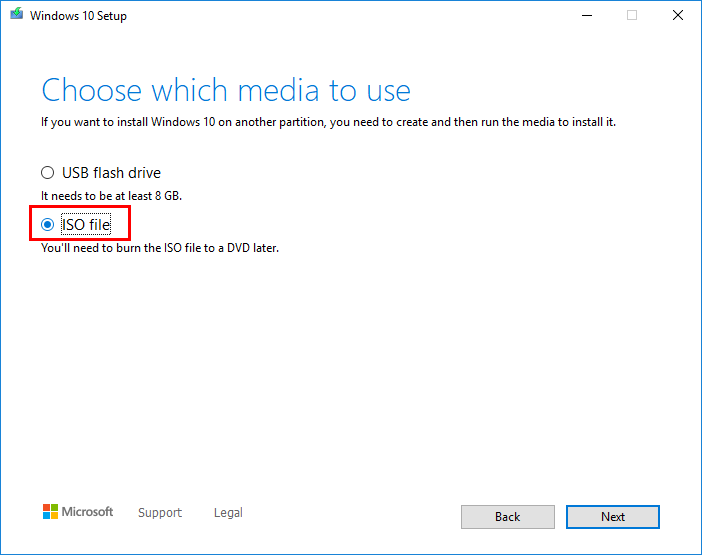
Step 4: Select your language, Windows edition, and architecture. On the next page, choose "ISO file" and click Next.
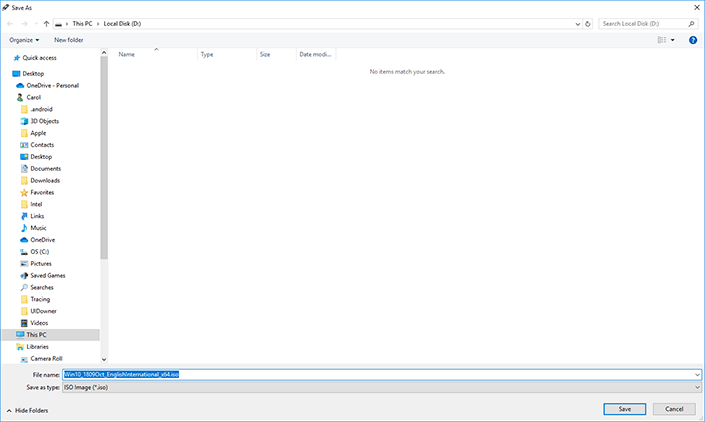
Step 6: Select the path where you want to save the Windows 10 ISO file, and then click Save.
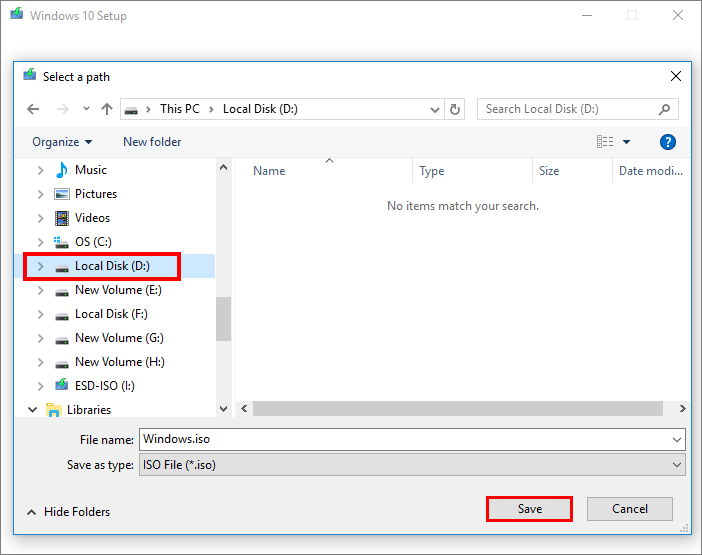
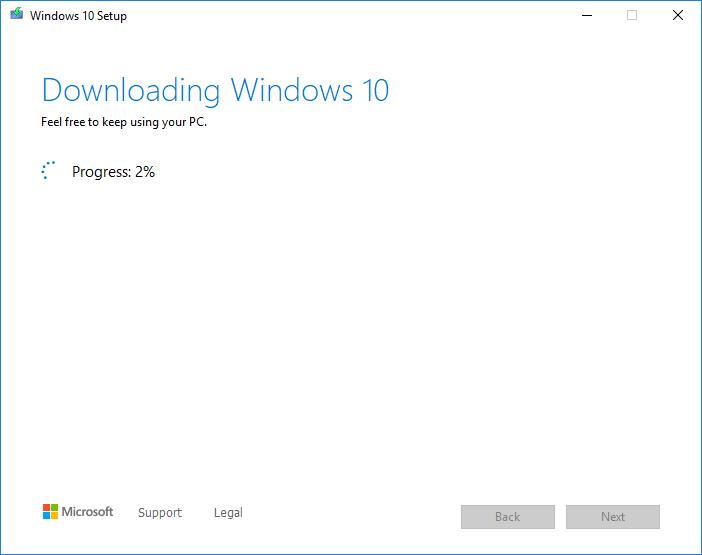
Step 7: The Media Creation Tool will immediately start downloading the Windows 10 ISO file on the path you selected.
Way 2: Download Windows 10 ISO via Chrome without any tools
If you're wondering how to download a Windows 10 ISO from the Microsoft website without using the Media Creation Tool or any other tool, follow the steps below.
Step 1: Open the Google Chrome browser on your computer and enter Microsoft's Windows 10 Download page.
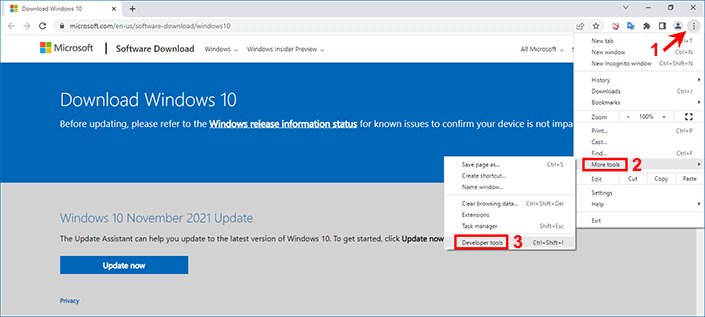
Step 2: Click the three-dots icon in the upper right corner of the Chrome window, and then select More Tools > Developer Tools from the pop-up menu. Alternatively, you can simply press Ctrl + Shift + I or F12 on your keyboard to open the Developer Tools.
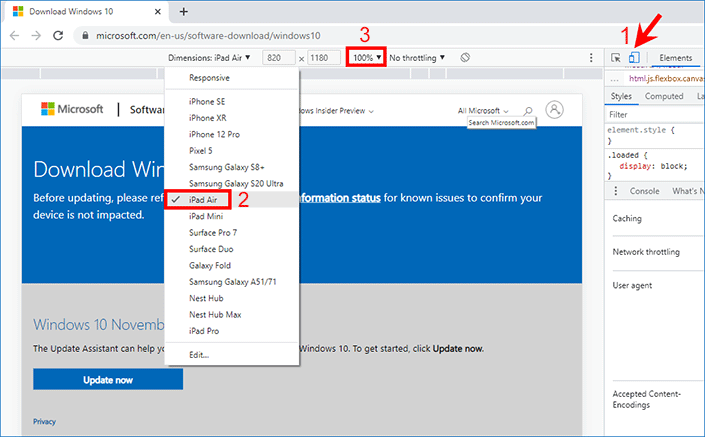
Step 3: Select the small "Toggle device toolbar" icon in the right pane, then choose a device model from the Dimensions drop-down menu on the left pane. You can choose iPad Air, and then adjust the display scale to 75% or 100%.
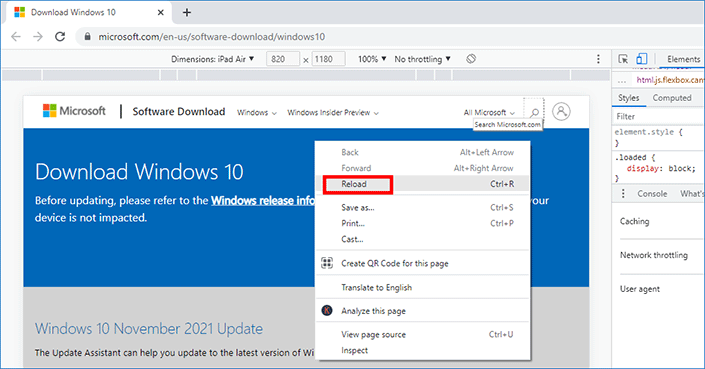
Step 4: Right-click on the Windows 10 Download page and select Reload from the context menu to refresh the page.
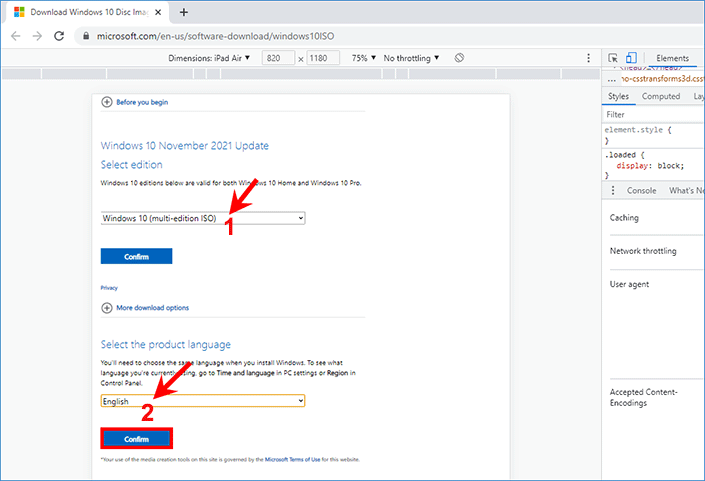
Step 5: After the page has refreshed, it displays "Download Windows 10 Disc Image (ISO) file". Select a Windows 10 edition from the drop-down menu and click Confirm. Then, select your language and click Confirm.
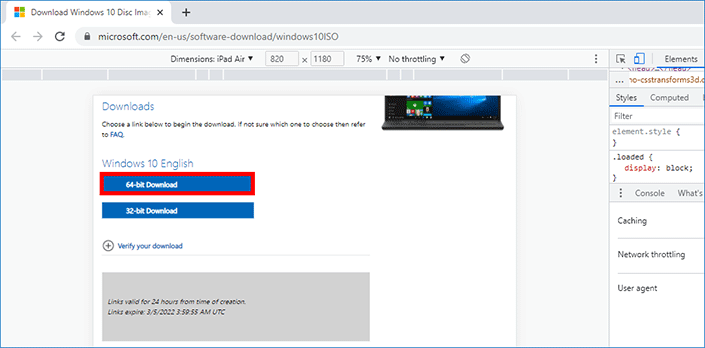
Step 6: Two Windows 10 ISO download buttons will be displayed, namely 64-bit Download and 32-bit Download. Click either download button. Then, choose where you want to save the 10 Windows ISO file and the download will begin immediately.
Way 3: Download Windows 10 ISO using Rufus
Rufus is another useful tool that helps you easily download a Windows 10 ISO file to your PC from Microsoft. Follow these steps.
Step 1: Open the Rufus website and download the latest version of Rufus under the Download section.
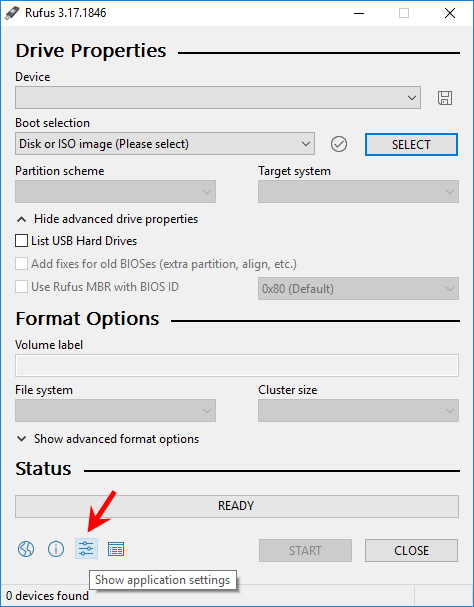
Step 2: Open the downloaded Rufus directly without installation, then click the "Show application settings" icon at the bottom.
Step 3: On the "Update policy and settings" dialog that opens, select Daily from the drop-down menu next to "Check for updates", and then click Check Now.
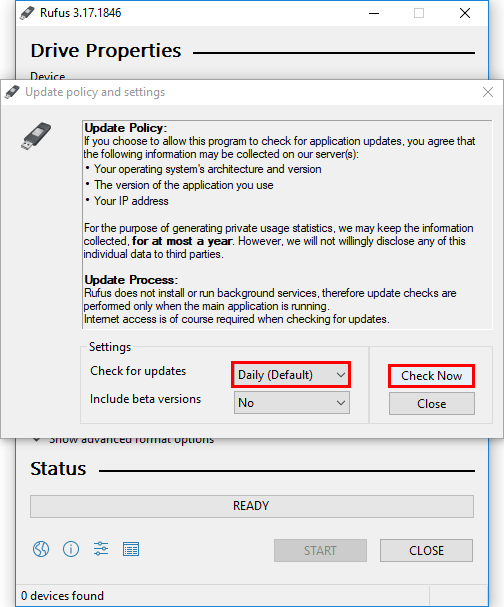
Step 4: After checking for Rufus updates, click Close, click Close again, and then close Rufus.
Step 5: Re-open Rufus. Click the small triangle next to the SELECT button and select DOWNLOAD from the drop-down menu.
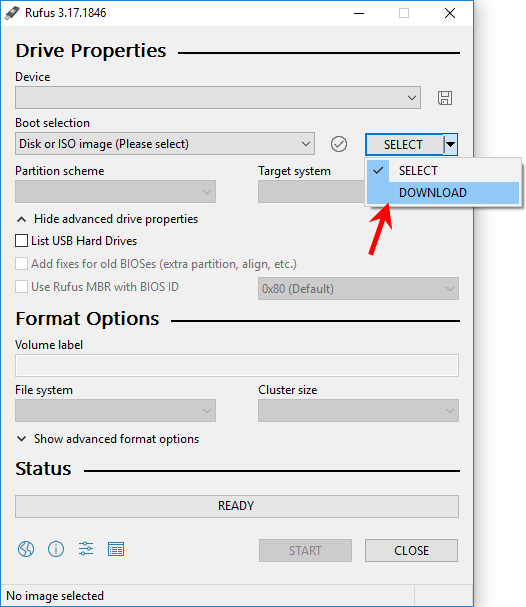
Step 6: Select Disk or ISO image from the drop-down menu under "Boot selection", and then click the DOWNLOAD button.
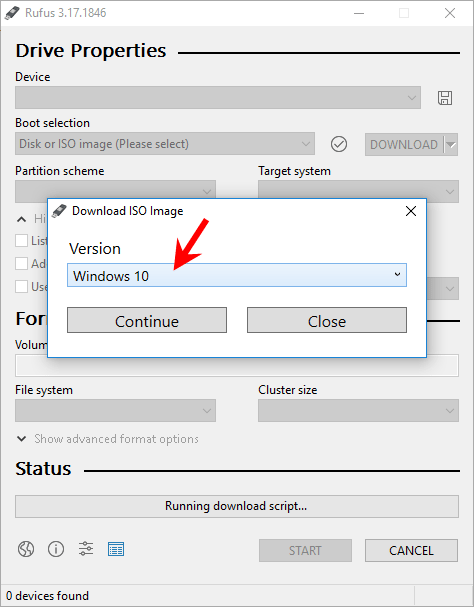
Step 7: A Download ISO Image dialog opens, asking you to select the ISO image version to download. Select Windows 10 and click Continue.
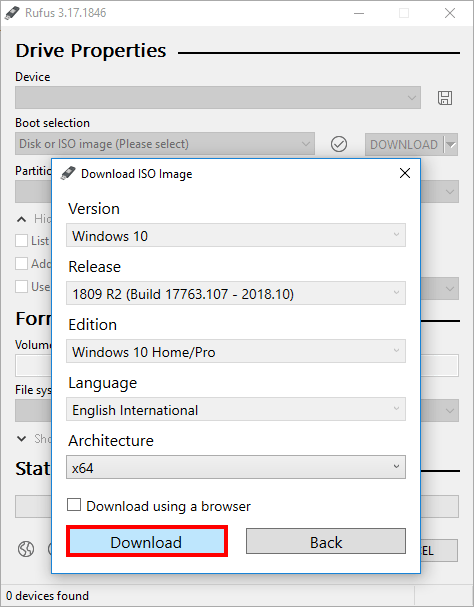
Step 8: Then, you need to choose the release version, Windows edition, language, and architecture for the ISO. After selecting each item, click Continue to select the next item. Finally, click the Download button.
Tips: You can also check the "Download using a browser" check box and click "Download", so that Rufus will download the Windows 10 ISO file directly through your browser.
Step 9: Rufus will open a Save As dialog. Choose where you want to save the ISO file, and Rufus will immediately start downloading Microsoft's official Windows 10 ISO file to your PC.
How to create a bootable USB for Windows 10

Windows 10 is set to be released later this month. The OS will be available on flash drives; however, if you want to make a bootable USB Pendrive for Windows 10, you can do that pretty quickly. Here’s how to do it:
The easy way to make a bootable USB Pendrive for Windows 10
There’s always an “easy way” to do things on Windows using some software. Creating a bootable USB pendrive is also pretty easy – here’s how to do it:
- Download Rufus from here
- Click and Open rufus.exe
- Once the user interface of the software opens up, plug in your USB
- After that, look for the “Create a bootable USB drive option,” and from the dropdown, select an ISO Image
- Then, click on the button next to the dropdown and select the Windows 10 ISO that you want to install
- Lastly, click on “Start” and wait for the software to create the bootable USB drive.
That’s pretty much it. You now have a bootable USB drive, plug it in your device and make sure your BIOS is all set up, and you should now be able to easily install Windows 10 using the bootable USB drive that you just created.
Create bootable USB Windows 10 Using Command Prompt
If you don’t want to use any software, there’s another way of creating a bootable USB drive, but that’s a bit trickier. Here’s how to do it:
- First, make sure your USB drive is plugged in.
- Search and open Command Prompt as an administrator.
- Next, you’ll have to open the disk management utility using CMD (Command Prompt) – to do that, type in diskpart and hit enter.
- After that, you will have to display the connected disks that are available – to do that, type in list disk and hit enter.
- Then, you’ll need to select your USB drive – to do that, type select disk # and hit enter – you’ll have to replace the # with your disk number.
- Next, you’ll have to clean the USB drive – to do that, type clean and hit enter.
- Then you’ll need to create a bootable partition – type in create partition primary and hit enter.
- You will now need to select the partition that you just created. To do that, type in select partition 1.
- After that, type active and hit enter.
- Next, you’ll need to format the USB drive – type in format fs=fat32 and hit enter.
- You’ll now need to assign your USB drive a letter. To do that, type in assign.
- Lastly, copy all the Windows 10 files and paste them into the USB drive. (You can copy the files by extracting an ISO or copying it from a Windows 10 disk).
That’s it! You have just manually created a Windows 10 bootable USB drive, and it’s ready to install Windows 10 on your device.
Creating a bootable USB drive windows 10 is pretty easy, to be honest. If you’re not an expert, I’d recommend following the easy way of creating the bootable USB Pendrive. However, if you’re an expert, follow the hard way of creating the bootable USB drive and avoid using any software.